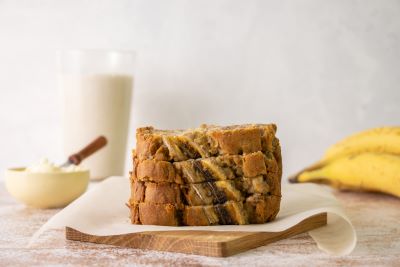
Dairy and Gluten-Free Coconut Banana Bread

Recipe makes: 12 to 13 servings (1 slice per serving)
Preparation time: 15 minutes
Cook time: 1 hour 15 minutes
Equipment: one set of measuring cups, one set of measuring spoons, one oven, one 9*5-inch (21*13 cm) loaf pan, parchment paper, two medium bowls, one large bowl, two large spoons, one whisk or fork or hand mixer, one spatula, one pair of oven mitts, one butter knife, one wire cooling rack or large plate, one serrated knife
What you need to make this recipe:
- 1 ½ cup gluten-free all-purpose flour
- 1 teaspoon baking powder
- 1 teaspoon baking soda
- 1 ¼ cup mashed ripe bananas (3 to 4 ripe bananas)
- ½ cup canned coconut milk
- 3 tablespoons + 1 teaspoon unsalted vegan butter, softened
- ¼ cup plain, unsweetened plant-based yogurt
- ½ cup white sugar
- 1 medium or large egg
- 1 teaspoon vanilla extract
How to make Dairy and Gluten-Free Coconut Banana Bread:
Step 1: Preheat the oven to 180°C (350 °F).
Step 2: Lightly grease a 9*5-inch (21*13 cm) loaf pan, using cooking spray or a small amount of vegan butter.
Step 3: Line the greased pan with parchment paper. To do this, cut a piece of parchment paper about 9 inches (21 cm) long from a roll of parchment paper. Then, put the piece of paper in the pan and press it into the bottom of the pan. The edges of the paper should hang over the long sides of the pan. If needed, cut any extra paper off the sides, so there is about 1 inch (2.5 cm) of paper hanging over each side of the pan.
Step 4: Put the flour, baking powder, and baking soda in a medium bowl. Using a large spoon, mix until combined.
Step 5: Put the mashed bananas and coconut milk in another medium bowl. Using a large spoon, mix until combined.
Step 6: Put the butter, yogurt, and sugar in a large bowl. Using a whisk, fork, or hand mixer, whisk until combined.
Step 7: Add the egg and vanilla extract to the butter mixture and whisk until smooth.
Step 8: Add about ¼ cup of the banana mixture to the butter mixture and whisk until smooth. Add about ¼ cup of the flour mixture to the butter mixture and whisk until smooth. Repeat until all of the mixtures are combined.
Step 9: Pour the batter into the prepared pan. Bake for 1 hour and 15 minutes or until a toothpick inserted in the center of the bread comes out clean.
Step 10: Cool the bread in the pan for 10 to 15 minutes.
Step 11: Take the bread out of the pan by running a butter knife between the parchment paper and the wall of the pan. Hold the sides of the parchment paper and gently lift the bread out of the pan. Take the parchment paper off the bread and put the bread on a wire cooling rack or large plate.
Step 12: When the bread is completely cooled, use a serrated knife to slice it into 12 pieces.
Allergy information:
Contains egg.
About this recipe:
Gluten and milk allergies are common in Canada. Usually, an allergy is caused by a protein in a food. Gluten is a type of protein found in some grains, including wheat, rye, and barley. Milk contains two main proteins, called casein and whey.
When a person has a food allergy, they can’t eat the food they are allergic to, even a very small amount. If you are making food for someone who has a food allergy, talk to them about how to make the food safe for them to eat.
Storage information:
Store the bread in an airtight container in the fridge for up to 6 days, or in the freezer for up to 3 months. Put a label with the date you made the bread on the container, so you know how long it has been in the fridge or freezer.
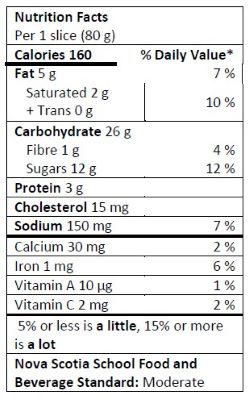
Nutrition Facts Table:

Print recipe card without photo